Top 20 pyRevit Tools for Revit

pyRevit is by far one of the best Free plugins for Revit. We picked our top 20 features that we couldn't imagine working without them. In this article, we're gonna dig into what makes pyRevit so amazing and how it turns you into a productivity wizard.
pyRevit Pa:
In 2014, an awesome architect named Ehsan Iran-Nejad came up with pyRevit, a multi-discipline plugin for Revit offering tools we dreamed of. This plugin is powered by IronPython and comes with a bunch of scripts that show off Ehsan's mad skills and his love for design and all things innovative.
Think of pyRevit as Revit's secret sauce for developers. It makes it super easy to create top-notch add-ons for Revit using Python. And the best part? You can share these tools with your team and develop in-house tools. Kudos to him for being such an archi-rock star! 🌟
Last update: October 2023
By: Andrii Tymoshchuk, Anais Simaan
Without further ado, let's jump into our favorite set of tools in PyRevit:
1. Overkill
Sounds familiar? The Overkill function is a great tool that takes its name and basic functionality from AutoCAD. The Overkill function in the pyRevit plugin helps users identify and remove unnecessary lines and eliminate duplicate geometry, resulting in cleaner drawings.

* a small description of the Overkill feature from the authors.
The overkill tool includes the following options:
- Overkill while considering Line Weights
- Overkill all lines
- Overkill Detail Lines
- Overkill Model Lines
- Overkill Room Separator Lines (very useful)

2. Match Tool
Copy and Paste element Graphic Overrides settings: First, click on the source objects, then click on all destination objects to apply the new graphic overrides.

Shift + Click on the tool to configure which graphic overrides to include when copying:

3. Renumber
Say goodbye to manual renumbering - pyRevit has got you covered! The Renumber function in pyRevit lets you quickly renumber elements like rooms, doors, and windows.

* a small description of the Renumber feature from the authors.
Elements that could be renumbered using pyRevit Renumber:
- Rooms
- Spaces
- Doors
- Doors by Rooms
- Walls
- Windows
- Parking
- Levels
- Grids
After choosing the starting number, the click sequence determines the order of the new numbers:

4. Manage Keynotes
Instead of editing text files outside Revit, use PyRevit's Manage Keynotes organizer to edit everything in one place: Add new categories, new keynotes, remove old ones, reorganize elements, and more. You can apply keynotes to a bunch of elements all at once. Also, finding the right keynotes quickly is now an option thanks to the search and filter bar.

* a small description of the Manage Keynotes feature from the authors.

5. Isolate
The Isolate function in pyRevit is a cool tool that makes it easy to control what you see in Autodesk Revit. With just one click, you can hide all the elements in the view except for the ones you select. It's a great way to focus on specific parts of your design and edit them in isolation mode. It offers more options than the built-in "Isolate Element" or "Isolate Category" tool so that you can also Isolate painted elements, model groups, etc.

* a small description of the Isolate feature from the authors.
Elements that could be isolated using py Revit Isolate:
- Area Boundary Lines
- Columns
- Doors
- Floors
- Structural Columns
- Walls
- Windows
- Room Tags
- Model Groups
- Painted Elements (most useful)
- Model Elements
One noticeable missing feature in Revit is the lack of ability to edit or detect painted elements quickly, this can be achieved using the pyRevit Isolate tool and picking the Painted Elements option:

Another handy tool is isolate model groups:

6. Print Sheets
The printing process in Revit improved over the years, but still not everything is possible using the native print tool. Customize your print settings, choose your paper size, and even print multiple PDFs with different sizes all at once.

* a small description of the Print Sheets feature from the authors.

Another big advantage of this feature is the ability to print multiple Sheets of different paper sizes!

7. Sheets Tools
PyRevit plugin Sheets dropdown menu includes 15 tools of the most wanted and missing features, most of which are easy to understand from their title:
- Copy Viewports (Legends) to Other Sheets
- Move Viewports (Model, Detail) to Other Sheets
- Pin All Viewports: we also recommend using the unselect Pinned Objects to save the pinned Viewports position for good
- Reorder Selected Viewports
- Copy Sheets To Open Documents
- Batch Sheet Maker (please see the next tool explanations)
- Select Sheets
- Rename Selected Views
- List/Select TitleBlocks on Sheets: super handy for replacing the Title Blocks Families
- Set Crop Region To Selected Shape: after creating a custom polygon
- Open Selected Viewports
- ReOrder Sheets: rename already printed PDFs from Revit in a specific folder
- Rename PDF Sheets: to UPPERCASE or lowercase
- Decrement Selected Sheets Numbers
- Increment Selected Sheets Numbers

* subfunctions related to Sheets that you can use.
8. Batch Sheet Maker
Create multiple sheets all at once, with custom names and numbers in a snap.

* a small description of the Batch Sheet Maker feature from the authors.

It's quite simple, but you need to understand that Revit sometimes quarrels with different sheet names, it does not like single "-", single numbers without a letter, and similar symbols.
As a result, we got a bunch of sheets with appropriate titles and reduced time spent on such a rather unpleasant process as creating sheets.
Pro tip:
Create an Excel file with two columns: Sheet Number and Sheet Name, fill it in, and copy and paste the information from Excel to pyRevit anytime you need it. This might be super handy in future projects too.

9. Tab Coloring
The Tab Coloring function in pyRevit is a cool tool for assigning colors to different tabs, making finding and switching between projects and Families easier.

Enabling the Feature:
To make full use of this feature in pyrevit plugin, you must first enable it. This is done as follows:- Go to the plugin settings
- Open the UI/UX tab
- Enable the Colorize Open Documents function (here you will immediately see the colors that will be used to highlight certain elements and the way they are highlighted).
- You can turn this feature on and off whenever you need it. All you need to do is click on the “Tab Coloring” tab (when the feature is enabled, you'll see the customized items highlighted, and the circle next to “Tab Coloring” will glow in a different color).

10. Wipe Tools
Revit has its Purge tool, but it can't always get rid of everything. That's where Wipe swoops in. Settings like view templates, filters, constraints, viewports, subcategories, blank elevation tags, and annotations that you didn't even know were cluttering up your model, can now be deleted.
- Wipe Model Component: (please see the next tool explanations)
- Wipe Attached Constraints: removes all attached constraints for the selected object
- Wipe Selected Families: (please see the next tool explanations)
- Wipe Site Designer Line Styles: removes all extra line styles that have been created
- Wipe Unpurgeable Viewport Types: to select the viewport/-s that needs to be changed to another, possibly correct its type
- Wipe Data Schema: deletes the selected data schema and its entities
- Wipe BIM360 Collab Cache
- Wipe SubCategories: resets all model categories and subcategories back to default
- Wipe Unused Filters: deletes all view parameter filter that has not been listed on any views, even for sheets
- Wipe Unused View Templates: delete all unused view templates
- Wipe Empty Elevation Tags: delete all empty elevation tags from the model)
- Wipe Empty Tags: removes all empty tags in the current view or SHIFT+click: removes tags in selected views
- Wipe ArrowHeads type: deletes selected arrow-head types
- Wipe All Project Parameters

* subfunctions related to wipe that you can use.
11. Wipe Model Components:
Quickly get rid of unnecessary components of your project, such as families, views, etc. With this tool, you can easily and simply summarise the results of your hard work and prepare the final version of your project.

12. Wipe Selected Families:
Thanks to this script, you can easily and quickly select Families and delete it from your project completely and permanently in one click.

13. Make Pattern
Say goodbye to boring two-line patterns. With this, you can create your own using lines, arcs, and circles. It's like having a pattern playground in Revit, way fancier than the regular pattern maker.

* a small description of the Make Pattern feature from the authors.
Creating a new pattern is a piece of cake. Check this out:

* let's draw a brick wall pattern using Detail Lines.
Creating a New Pattern
We make a frame in which our hatching will be marked to help us navigate in space. We assume that the size of the brick is the standard 250 x 120 x 65 mm, with an additional 1 cm for mortar.

* I made a frame and appropriate indents for the mortar. Additionally, I made the lines of the frame thicker for orientation in space.
After drawing the base tile for the Pattern, all you need to do next is select the lines, use the Make Pattern function, and name it.

* don't forget to select the pattern lines!
Give your new pattern a name and choose the options you want.

* don't forget to select the hatching! But remember that you don't have to select a frame!
After you click Create Pattern, you'll need to select the lower left point and the upper right point as if you were drawing a diagonal.

* if everything is done correctly, you will receive such a message.
As a result, you get a Pattern in the Model tab that you can use in the Filled Region, but no one prevents you from using Pattern when selecting Surface Pattern or Cut Pattern.

* On the left, we have our drawing, and on the right, the area to fill in where we used our Pattern.
Editing an existing Pattern
So, here's what happened: I ended up with something like this, and yup, there's a mistake. I totally forgot to mark out another row of bricks. But no worries, it's an easy fix. All you have to do is toss in that missing row of bricks and hit the "Make Pattern" button again. It's as simple as that!

* click the arrow to the right of the name.
In the name, select an existing pattern (in our case, Brick Wall 250x120x65) and click Create Pattern. As a result, the Pattern will be updated, not created, and if you have already used it, it will be automatically replaced with a newer version.

* now we have beautiful custom hatching quickly and conveniently.
Important!We can add patterns to any material, but remember to look for it under the right tab: Drafting / Model tab. This is how it looks on the wall:

* this is what the wall looks like on the elevation view.
14. Copy State / Paste State
Copy State
Using PyRevit plugin you can copy settings that cannot be copied using native Revit Tools. A very useful feature to keep your project in order and keep the same style of your working drawings from the selection area, zoom view, and Visibility/Graphics.

* a small description of the Copy State feature from the authors.
The Copy State tool includes the following options:
- Copy View Zoom/Pan State
- Visibility Graphics
- Crop Region
- Filter Overrides
Paste State
A complementary feature of the previous function, it transfers the selected state from the previous picture to the next one you need.

* a small description of the Paste State feature from the authors.
Example:
Moving the Crop Region from floor 1 to floor 2:

* Сrop Region moved from the 1st floor to the 2nd floor. Quickly and well.

.
15. Family Tools
One thing you can't do without Revit is families. Therefore, we must be able to manage and use them correctly.

* sub functions related to Family functions that you can use.
Family QuickCheck:
Detect corrupt Revit Families that can potentially damage your model or generate future error messages.

Save and Load Families:
Batch save Families to a folder, or load multiple Families into your Revit project.

* this gif-animation shows how the family saving script works

* this gif-animation shows how the family loading script works
Convert Families to Face Host Based:
The script allows you to remove all previous instances of the family you selected and tries to convert it to Face Host Based. Please note that the feature works for specific types of models and families (see the script description for details).

* the description of the script describes the families that can be converted
16. Edit Tools
A various set of tools for small tasks that are not available through Revit native tools:
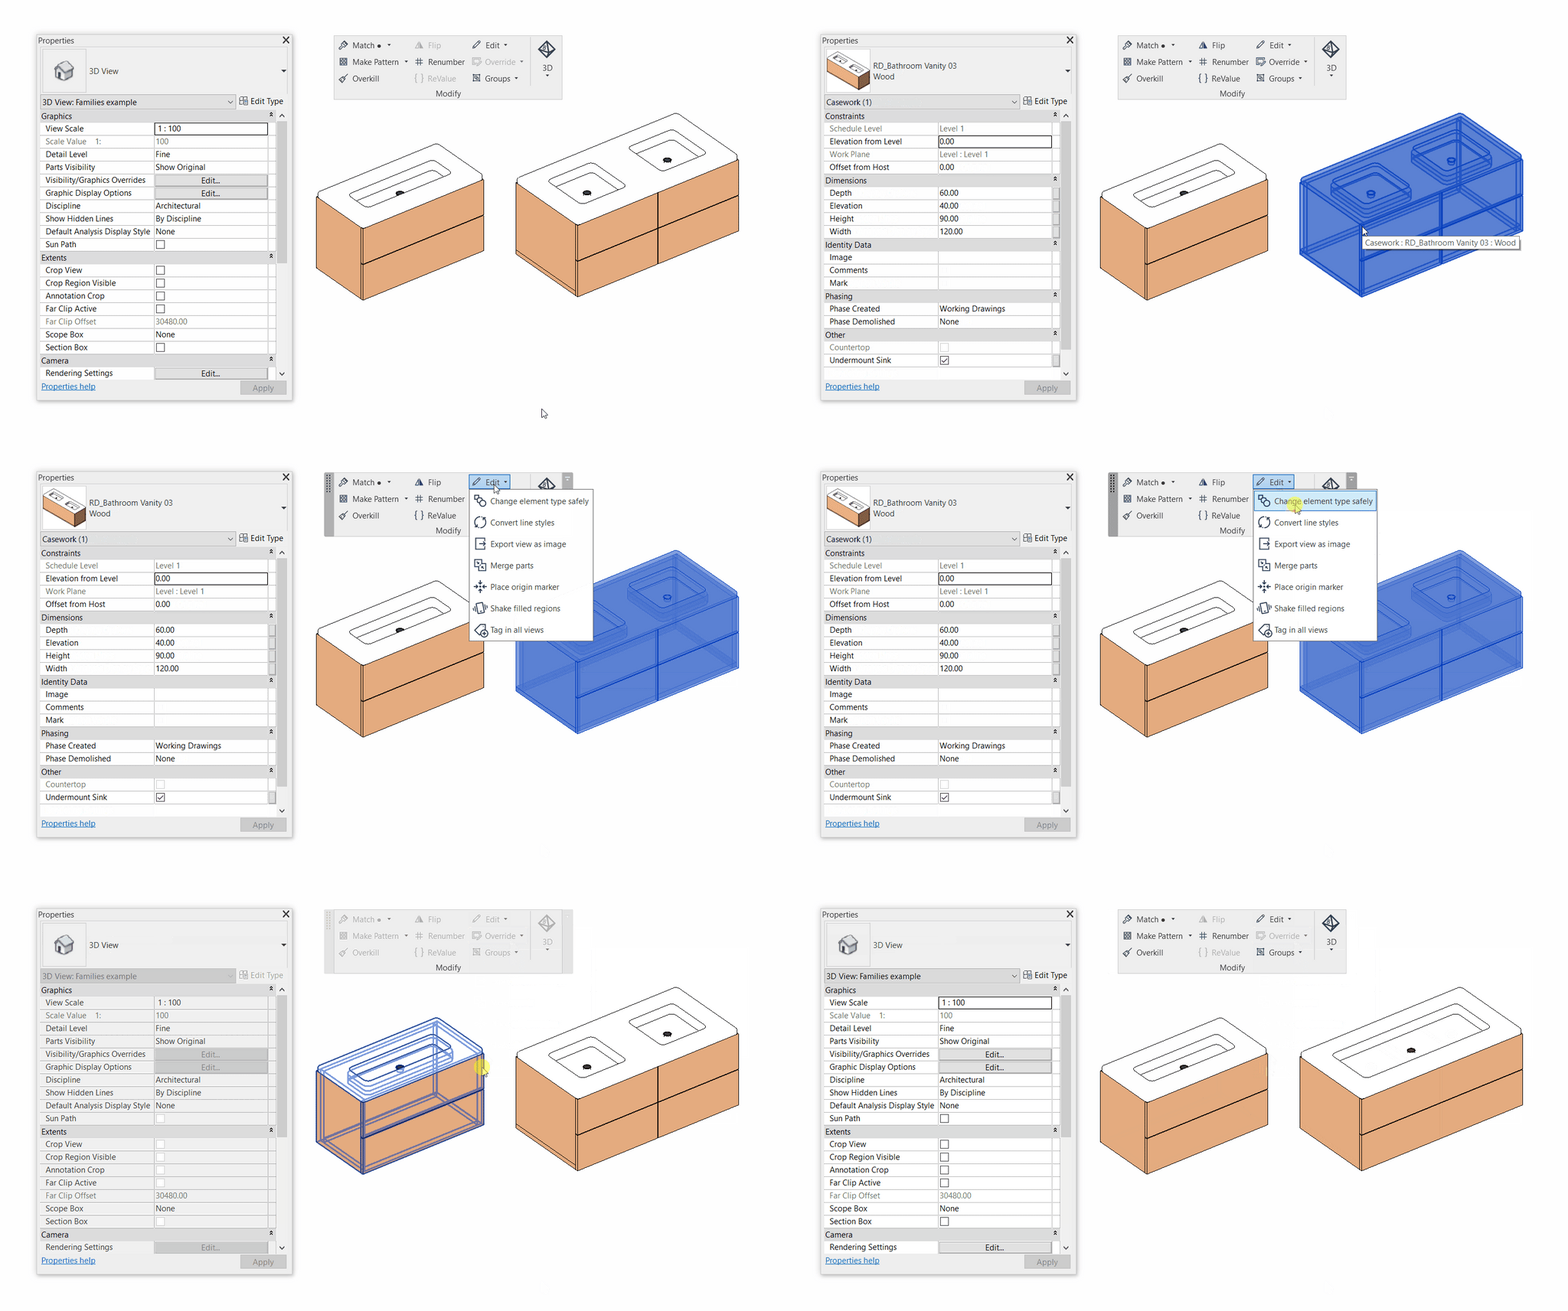
Change Element Type Safely:
Change Element Type while maintaining the values of all instance parameters.
Remember, you must first select the object you want to use for this function!

* a small description of the CChange element type safely feature from the authors.
Convert Line Styles:
This tool can easily help you convert your chosen lines of one type to another across your entire project. Please note that Lines that are part of a group, will not be changed.

* a small description of the Convert line styles feature from the authors.

Export View as Image:
The generated image has a 600 DPI in PNG format, which is the highest value possible for generating images from Revit. Please note that image sizes with such resolution might be too heavy.

* a small description of the Export views as image feature from the authors.

* a small description of the Merge parts feature from the authors.
Place Origin Marker:
Sets the point of origin to 0, 0, 0. It is also quite useful if you use other software in parallel, such as AutoCAD, etc. In this case, you can use this marking to check if the exported drawing/model has the same coordinates.

* a small description of the Place origin marker feature from the authors.

Shake Filled Regions:
An interesting addition to the line type conversion feature, useful for large projects where filled regions are "lost". Similar to the REDRAW and REGEN commands from AutoCAD.

* a small description of the Shake filled regions feature from the authors.
Tag in All Views:
The function automatically gives tags to choose from either on the project spaces or on rooms on all views.
It is quite important for those who are time-conscious and want to optimize their work.

* a small description of the Tag in all views feature from the authors.
17. 3D Tools
Orient Section Box to Face:
As the name of the function says, it orientates the sectional box parallel to and perpendicular to the face of the object you selected.
 * a small description of the Orient section box to face feature from the authors.

Orient View to Face:
Similar to the previous function with a slight difference, now we rotate not the sectional box relative to the selected face, but the view itself relative to the selected face.

* a small description of the Orient view to face feature from the authors.

18. View Tools
A wide range of tools for working on your types. It's hard to imagine what's missing.
- Open Referencing Sheet
- Open Refererring Views
- Search Views By Filter
- Query View Sheet Placement: compares the list of views that have not been placed on any sheet
- Query View Referencing: queries all selected views and determine if referenced or not
- Close Tabs
- Rename Selected Views
- Duplicate Selected Views
- Create a print set from Selected Views
- Find Used View Templates Filters: compare a list of all view templates and filters that have been assigned to each
- Copy Selected Views Templates to other open models
- Toggle All Grid Bubbles in Current View (the function can be found below)
- Match Title On Sheet in Open Docs (the function can be found below)
- Create Parallel Section
- Add Views to Sheets (the function can be found below)
- Remove Underlay From Selected Views
- Include or Exclude Template Parameters

* sub functions related to View functions that you can use.
Toggle All Grid Bubbles in Current View
Toggles all or selected grid bubbles in the active view.
Easy and fast!

* a small description of the Toggle All Grid Bubbles in Current View feature from the authors.

Match Title on Sheet in Open Docs
Sometimes the View Title and Title on Sheet values are different, instead of going through the list of views and correcting that manually, use this tool.

* a small description of the Match Title On Sheet in Open Docs feature from the authors.

Add Views to Sheets
Can add multiple Views to multiple Sheets. Please note that model views (plans, sections, elevation, and so on) cannot be added to more than one Sheet. On the other hand, Legends and Detail Views can exist on multiple Sheets at the same time.

* a small description of the Add Views to Sheets feature from the authors.

19. Pick
An ideal feature for large projects, it allows you to activate the selection for Model or Detail items only, making the other categories visible but not touchable. A big plus is that the selection list can be expanded with SHIFT+Click, making your work more efficient.

* a small description of the Pick feature from the authors.

Pick Detail Elements
Activates the selection of Detail elements such as Text, Dimensions, Tags, Annotation and more.

* a small description of the Pick Detail Elements feature from the authors.

20. Inspection Tools
This series of functions works in the "Ctrl+F" style to find the required items. The number of items you can find is quite wide, so experiment.
- Count lines of selected style: counts all lines in the model with a matching style to the selected line
- Find all attached constraints: find all constraints attached to the selected elements
- Find identical room numbers: (please see the next tool explanations)
- Find monitored Revit links: lists Revit links that are being monitored by selected element(s)
- Find referenced elements: lists all the elements that are tied to the selected element
- Find referenced views by selected elevations tag: lists all the views referenced by the selected elevation tag
- Find Referencing Sheets: (please see the next tool explanations)
- Find sheets showing selected element: lists all sheets and views that the selected elements are visible in
- Find view showing selected element: lists all views that the selected elements are visible in
- Kines Per View Counter: lists sorted Detail Line Counts for all views with Detail Lines
- List Elements of Selected Levels(s): (please see the next tool explanations)
- List Family Sizes

* a small description of the Inspect feature from the authors.
Find identical room numbers
Identical Room Numbers can result in incorrect area calculations and program mistakes. In one click, the script will find the Identical Room numbers.

* a small description of the Find Identical Room Numbers feature from the authors.
Find Referencing Sheets
This feature will help you navigate where the plans you are working on are located in your sheets.

* a small description of the Find Referencing Sheets feature from the authors.

List Elements of Selected Levels(s)
This feature will help you understand how many and which specific items you can find on a particular level.

* a small description of the List Elements of Selected Level(s) feature from the authors.

Conclusion:
It takes some time to know what you don't know about pyRevit's large set of tools, and even more when you discover its extension packs, more than 12 new tabs to be added to your Revit interface (we will cover that in our next article). Our advice, take a break every now and then and ask yourself what repetitive tasks are taking over your day and how can you minimize the hours spent on the architectural "bureaucracy" and start investing this time wisely.
We hope this (very long) article has given you the motivation to dig in and start exploring new productivity tools that are totally free. So, why wait? Get it and start creating some seriously awesome stuff! 🚀





Leave a comment